If you are a gamer or a video editor, you might want a display with higher refresh rates. The higher the refresh rate, the faster the image changes (or refreshes) on display. A higher refresh rate is essential for a better and smoother viewing experience. If you have a monitor with a low refresh rate, you will notice screen flickering. It might even lead to headaches and eye strain in the worst case. So, if you have a compatible monitor and a dedicated GPU, you might want to change the display refresh rate on Windows 11. Although Windows 11 automatically sets the optimal refresh rate, users sometimes need to change the settings manually. Also, Windows 11 has a Dynamic Refresh Rate feature that automatically increases or lowers the refresh rate on high-refresh panels. Also read: Windows 11 Keyboard Shortcuts
Steps to Change the Display Refresh Rate on Windows 11
So, in this article, we will share a detailed guide on how to change the display refresh rate on Windows 11. The steps were pretty simple to follow; follow them as directed.
First of all, open Settings on your Windows 11 computer.
On the left pane, click on the System option.
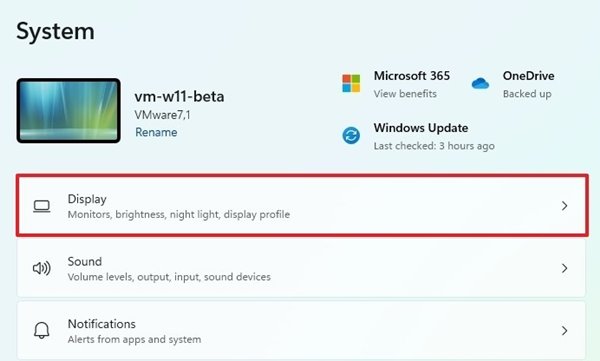
On the right pane, click on the Display option as shown below.
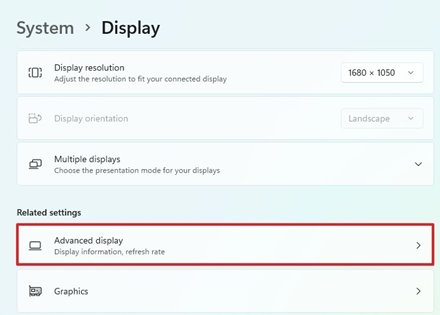
Under the Related settings, click on the Advanced Display option.
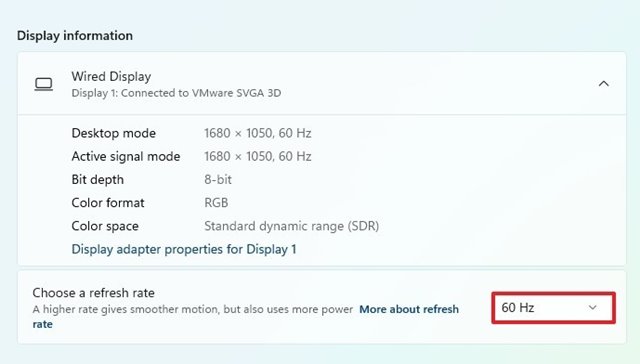
Now, under the Choose a refresh rate, select the refresh rate as per your preference.
Choose a refresh rate; you will find a ‘Dynamic’ option. This option is available only on supported hardware. You can select this to adjust the refresh rate automatically. That’s it! You are done. This is how you can change the display refresh rate in Windows 11. After following the steps, make sure to restart your PC. Windows 11 will automatically increase or lower the refresh rate to save power if you have set the Dynamic option. I hope this article helped you! Please share it with your friends also. If you have any doubts about this, let us know in the comment box below.
Δ


